

You know what’s crazy? I’ve been grinding Free Fire for almost 4 years now, and I still remember the exact moment when everything clicked for me. I was watching Raistar destroy enemies in a ranked match, hitting headshot after headshot with surgical precision, and I thought to myself: “What am I doing wrong?”
Here’s the brutal truth: It wasn’t his gaming chair, his expensive phone, or some secret hack. It was his free fire sensitivity settings that made all the difference.
Let me paint you a picture. You’re in the final zone, heart pounding, palms sweaty. You’ve got that perfect angle on the last enemy squad. You line up your crosshair, take the shot… and watch in horror as your aim goes completely sideways. Sound familiar?
I used to think I was just “bad at aiming.” I was using completely wrong sensitivity settings for my device and playstyle. And guess what? 90% of Free Fire players are making the same mistake.
What are Free Fire Sensitivity Settings and Why Do They Matter So Much?
Look, let’s start with the basics because this is where most players get completely lost. Free fire sensitivity controls how fast your camera moves when you swipe your finger across the screen. Think of it as the connection between your finger movement and what happens on screen.
Here’s the thing – sensitivity isn’t just one setting. It’s actually multiple settings working together:
- General Sensitivity: Controls your basic camera movement
- Red Dot Sensitivity: How fast you move when using red dot sights
- Scope Sensitivity: Controls movement with 2x, 4x, 8x scopes
- Free Look Sensitivity: How quickly you can look around without moving your character
Why is this so important? Because every weapon, every situation, every range of combat needs different precision levels. When you’re spraying an SMG up close, you want fast sensitivity. When you’re lining up that perfect AWM headshot from 200 meters? You need surgical precision.
The best sensitivity for free fire is the one that gives you control in ALL situations, not just one. Most players set everything to 100 and wonder why they can’t hit long-range shots. Others set everything super low and get destroyed in close combat.
What is DPI in Free Fire and How Can You Increase It?
Some players are familiar with the term DPI but don’t exactly know what it means or how it works. DPI is an acronym for Dots Per Inch, and simply refers to how sensitive the touch on a screen is in terms of accuracy as well as speed. It’s like the sharpness in your cuts:
- Higher DPI → Faster and more responsive screen movements.
- Lower DPI → Slower, but steadier and easier to control.
In Free Fire or Free Fire MAX, the best dpi for free fire headshot setting can help you hit more consistent headshots. Especially for one-tap headshot players, DPI combined with the best sensitivity makes a big difference.
Recommended DPI for Different Devices:
| Device Type | Suggested DPI Range | Why It Works |
| 2–3 GB RAM Phones | 400 – 500 | Keeps the game smooth without lag. |
| 4–6 GB RAM Phones | 500 – 600 | Balanced performance for mid-range devices. |
| 6 GB+ High-End Phones | 600 – 800 | Maximum smoothness, great for drag headshots. |
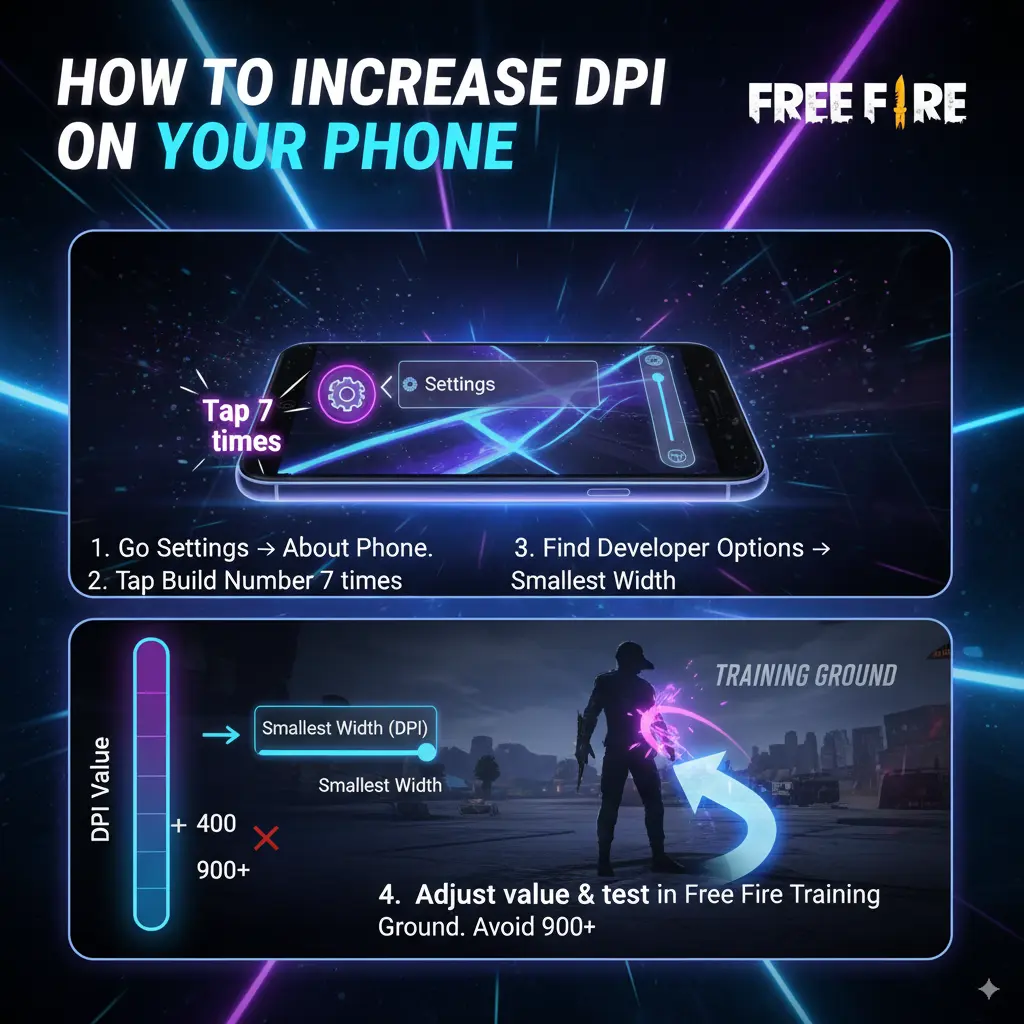
Note: Do not set DPI too high (like 900+) because it may cause touch glitches or battery drain.
How To Increase DPI on Your Phone
- Go to Settings on your phone.
- Scroll down and open About Phone → Tap on Build Number 7 times to enable Developer Options.
- Go back to Settings → Now find Developer Options.
- Inside Developer Options, look for Pointer Speed or Smallest Width (this varies by phone).
- Adjust the value:
- Increase slightly (e.g., from 400 → 500) and test in Free Fire.
- Open Free Fire Training Ground and try drag shots/headshots. If it feels too fast or uncontrollable, lower it by 50–100.
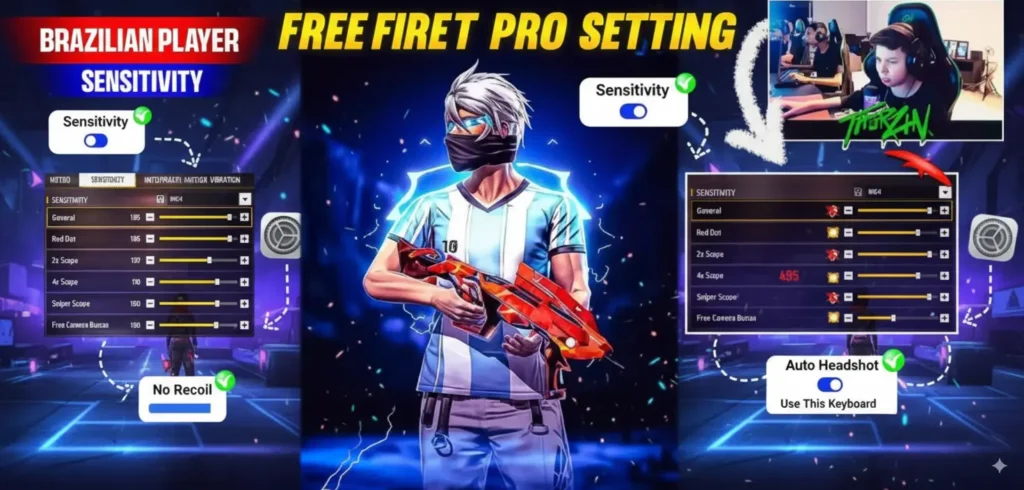
Pro Tip From Players Like White444 and Apelapato
Most pro Brazilian players keep DPI around 500–600 for perfect drag headshots. They combine this with Free Fire headshot sensitivity settings to make aiming smooth and deadly accurate.
Best Free Fire Sensitivity Settings for Budget Devices (4GB RAM and Below)
Alright, let’s talk about the elephant in the room. Not everyone’s rocking the latest iPhone or flagship Android. Most of us are grinding on budget devices, and honestly? That’s totally fine. I climbed to Grandmaster on a 4GB RAM phone.
Here’s the secret for free fire max sensitivity for 4 GB RAM headshot:
For budget devices, you actually want HIGHER sensitivity settings. Why? Because lower-end phones have input lag and frame drops. Higher sensitivity compensates for this delay.
Optimal Settings for 3GB-4GB RAM Devices:
- General Sensitivity: 95-100
- Red Dot: 90-95
- 2x Scope: 85-90
- 4x Scope: 80-85
- 8x Scope: 75-80
- Free Look: 95-100
Why these numbers work: Your phone might skip frames or have slight delays, so higher sensitivity ensures your inputs register properly. Plus, the slightly aggressive settings help with the fast-paced nature of budget device gameplay.
Pro Tip from my experience: If you’re getting frame drops in intense fights, bump your general sensitivity to 100. It sounds crazy, but it actually helps maintain consistency when your phone is struggling.
Optimized Free Fire Sensitivity for High-Performance Devices (6GB+ RAM)
Now, if you’re lucky enough to have a beast of a phone, your approach needs to be completely different. High-end devices give you the luxury of precision, so you can afford to use lower, more controlled sensitivity settings.
Free fire best sensitivity for headshot 2025 on premium devices focuses on surgical precision rather than compensating for hardware limitations.
Premium Device Settings (6GB+ RAM, 90Hz+ Display):
- General Sensitivity: 85-90
- Red Dot: 80-85
- 2x Scope: 75-80
- 4x Scope: 70-75
- 8x Scope: 65-70
- Free Look: 80-85
The logic here: Your phone responds instantly to every micro-movement. Lower sensitivity gives you pixel-perfect precision for those crucial headshots. This is exactly why pros like White444 and Nobru can hit shots that seem impossible.
Real talk: I upgraded from a 4GB to an 8GB phone last year, and I had to completely relearn my sensitivity. The precision difference is night and day.
Device-Specific Free Fire Sensitivity Breakdown
Let me break this down even further based on exactly what you’re playing on. I’ve tested these settings with hundreds of players across different devices.
Budget Warrior Settings (3GB-4GB RAM, 60Hz Display)
| Setting Type | Recommended | Why This Works |
| General | 100 | Maximum responsiveness for lag compensation |
| Red Dot | 95 | Quick close-range target switching |
| 2x Scope | 90 | Balanced for the most common engagements |
| 4x Scope | 85 | Stable for medium-range precision |
| 8x/AWM | 80 | Controlled long-range shots |
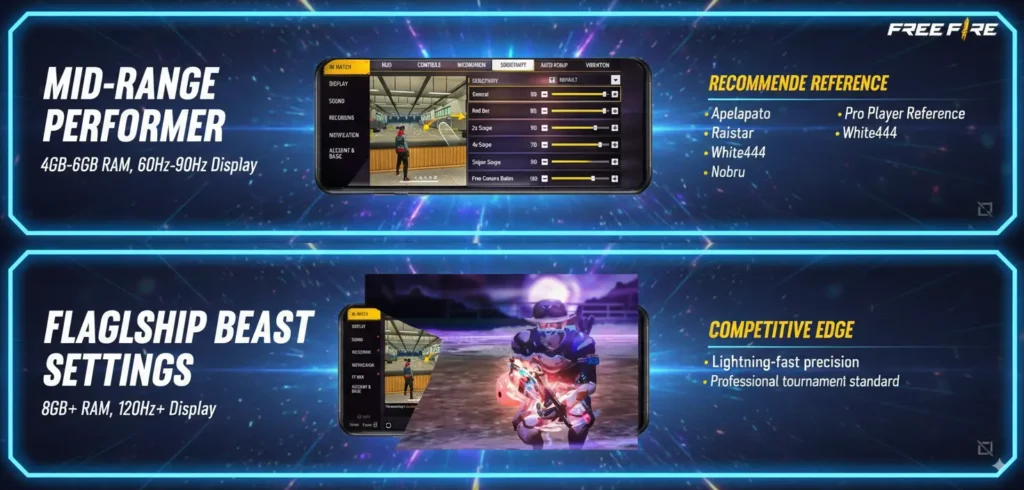
Mid-Range Performer Settings (4GB-6GB RAM, 60Hz-90Hz Display)
| Setting Type | Recommended | Pro Player Reference |
| General | 90-95 | Similar to Apelapato’s setup |
| Red Dot | 85-90 | Raistar’s close combat preference |
| 2x Scope | 80-85 | White444’s balanced approach |
| 4x Scope | 75-80 | Nobru’s precision standard |
| 8x/AWM | 70-75 | Tournament-level accuracy |
Flagship Beast Settings (8GB+ RAM, 120Hz+ Display)
| Setting Type | Recommended | Competitive Edge |
| General | 85-90 | Lightning-fast precision |
| Red Dot | 80-85 | Pixel-perfect close combat |
| 2x Scope | 75-80 | Surgical mid-range accuracy |
| 4x Scope | 70-75 | Sniper-level precision |
| 8x/AWM | 65-70 | Professional tournament standard |
Step-by-Step Guide: How to Configure Your Settings Like a Pro
Okay, here’s where most tutorials fail you. They give you numbers but don’t tell you HOW to actually implement them properly. Let me walk you through this like I’m sitting right next to you.
Step 1: Access Your Settings
- Open Free Fire
- Tap the gear icon (Settings) on the main screen
- Go to the “Free Fire Sensitivity” tab
- You’ll see different categories – don’t get overwhelmed!
Step 2: Start with General Sensitivity
- This is your foundation. Everything else builds on this.
- Use my device-based recommendations above
- Don’t change anything else yet!
Step 3: Test in Training Ground (Crucial!)
- Go to Training Ground with an AK-47
- Practice tracking the moving targets
- If you overshoot targets, reduce by 5 points
- If you undershoot, increase by 5 points
Step 4: Configure Scope Settings
- Always make scope sensitivity LOWER than general
- Rule of thumb: Each scope level should be 5-10 points lower
- Start with 2x scope (most commonly used)
Step 5: Fine-tune with Real Matches
- Play 5 ranked matches before changing anything
- Focus on consistency, not just good moments
- Document what feels off
How to Test and Perfect Your Personal Sensitivity Settings
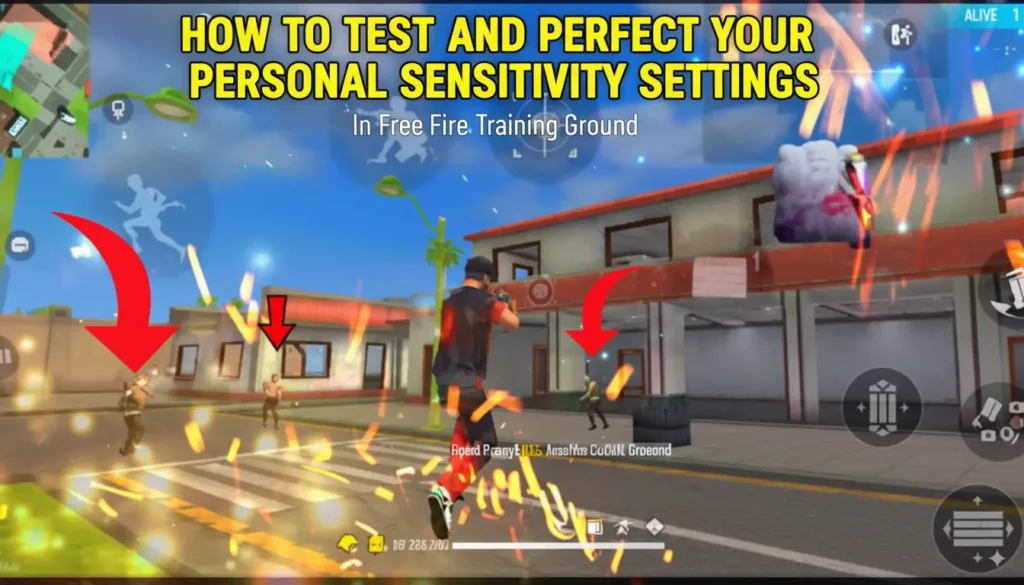
Here’s my personal testing protocol that took me from Diamond to Grandmaster. This isn’t some generic advice – this is the exact method I used.
The 7-Day Sensitivity Challenge:
Day 1-2: Baseline Testing
- Set your device-appropriate settings from my tables above
- Play only Training Ground for 30 minutes each day
- Practice these specific drills:
- Flick shots with an AK-47
- Tracking moving targets with M1014
- Long-range precision with Kar98k
Day 3-4: Real Combat Testing
- Take your settings into Clash Squad (shorter matches, more fights)
- Focus on different engagement ranges for each match
- Note which situations feel uncomfortable
Day 5-6: Fine-Tuning Phase
- Adjust only ONE setting type per day
- Change in increments of 5 points maximum
- Test immediately after each change
Day 7: Lock and Load
- Finalize your Free Fire Sensitivity settings
- Play one full Battle Royale match
- If it feels good, commit to these settings for 2 weeks minimum
The Secret Testing Method: Record your gameplay (most phones have built-in screen recording). Watch your missed shots in slow motion. If you’re consistently overshooting, reduce sensitivity. If you’re undershooting, increase it.
Free Fire Sensitivity Settings Based on Your Playstyle
Now here’s where it gets really interesting. Your free fire headshot sensitivity should match how you actually play the game, not some generic recommendation.
Sensitivity Configuration for Aggressive Rushers
If you’re the type who charges into every fight like Raistar, you need settings that support rapid target acquisition and close-range dominance.
Rusher’s Setup:
- General: 95-100 (Lightning-fast camera movement)
- Red Dot: 90-95 (auto headshot free fire best sensitivity settings 2025)
- 2x Scope: 85-90 (Still aggressive but controlled)
- Free Look: 95-100 (Constant enemy scanning)
Why this works: As a rusher, you’re constantly switching between multiple enemies in close quarters. High sensitivity lets you snap between targets instantly. Your best Free Fire headshot sensitivity for rushing focuses on red dot optimization since you’ll rarely use higher scopes.
Pro Rusher Secret: Keep your 4x and 8x scopes much lower (75-80) for those rare long-range opportunities. Don’t sacrifice your close-game dominance for occasional sniper shots.
Sensitivity Settings for Sniper Specialists
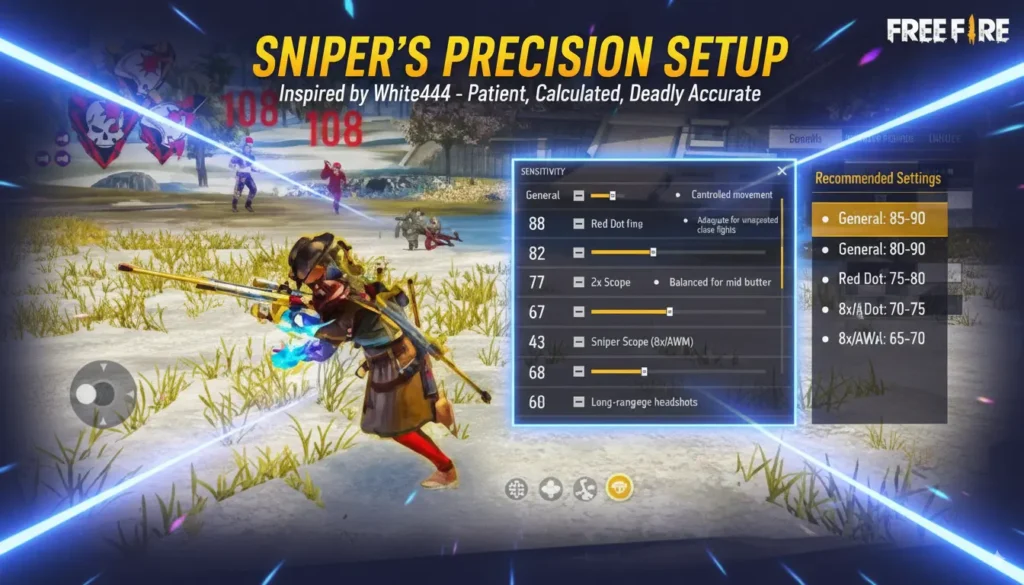
If you’re more like White444 – patient, calculated, and deadly accurate from distance – your sensitivity philosophy needs to be completely different.
Sniper’s Precision Setup:
- General: 85-90 (Controlled movement)
- Red Dot: 80-85 (Adequate for unexpected close fights)
- 2x Scope: 75-80 (Balanced for mid-range)
- 4x Scope: 70-75 (Your bread and butter)
- 8x/AWM: 65-70 (free fire best sensitivity for long-range headshots)
The Sniper’s Philosophy: Every shot counts. You can’t rely on spray-and-pray tactics. Your settings prioritize surgical precision over speed. This is especially crucial for free fire best sensitivity for headshot 2025 meta.
Advanced Sniper Tip: Practice the “pre-aim” technique. Set your crosshair where enemies will appear, then make micro-adjustments. Lower sensitivity makes these tiny movements possible.
Sensitivity Settings for Versatile All-Rounders
Most players (including myself) fall into this category. We adapt to situations – rushing when needed, sniping when the opportunity arises, playing support when the team needs it.
Balanced Mastery Setup:
- General: 90-95 (Flexible for all situations)
- Red Dot: 85-90 (Strong close-range capability)
- 2x Scope: 80-85 (Your most-used scope)
- 4x Scope: 75-80 (Reliable medium-long range)
- 8x/AWM: 70-75 (Competent sniping when needed)
The All-Rounder Advantage: You’re never caught completely off-guard. These settings give you 80% effectiveness in all scenarios rather than 100% in one specific situation.
Pro All-Rounder Strategy: Master the 2x scope above all else. It’s used in 70% of your fights. Perfect this, and your overall game will improve dramatically.
Advanced Tips That Pros Don’t Want You to Know
After studying countless pro players and testing with competitive teams, here are the insider secrets:
Secret #1: The “Comfort Zone Rule” Never use sensitivity settings that feel uncomfortable, even if they’re “optimal.” Your muscle memory beats perfect numbers every time.
Secret #2: The “Scope Hierarchy” Your sensitivity should follow this pattern: General > Red Dot > 2x > 4x > 8x > AWM. Each step should be 5-15 points lower.
Secret #3: The “Device Upgrade Transition” If you upgrade your phone, reduce ALL sensitivity settings by 10-15 points initially. High-end devices are much more responsive.
Secret #4: The “Meta Adaptation” When new weapons are released, test if they need unique sensitivity adjustments. The recent Trogon SMG, for example, works better with slightly lower red dot sensitivity due to its fire rate.
Final Words
Look, I’m going to be real with you. Finding your perfect best sensitivity for Free Fire isn’t going to happen overnight. It took me almost a month of consistent testing and adjustment to find settings that felt truly “right.”
But here’s what I can promise you: Once you dial in your personal sensitivity configuration, everything changes. Your aim becomes more consistent. Your confidence in fights skyrockets. Those impossible headshots? They start becoming routine.
The trick is patience and methodical experimentation. Don’t try to chase the latest YouTube trend or mindlessly duplicate your favorite streamer. Your ideal sensitivity is as unique as your fingerprint.
Begin with my device-based suggestions, implement the testing protocol I’ve described, and have faith in what you’re doing. Perhaps most importantly, once you do find settings that work, stick with them long enough to develop good muscle memory.
And remember: no great player is endowed with perfect aim – they earn it by making clever sensitivity choices and grinding for hours.